
Clearpay On-Site Messaging App
This page shows you how to do the following:
-
Install the Clearpay On-site Messaging App - A procedure to install the app
-
Add the Messaging to the Product Pages - Instructions on how to add the messaging to the Product Pages
-
Add the Messaging to the Cart Page - Instructions on how to add the messaging to the shopping Cart Page
-
Adjust the Style of Messaging - This covers things like text alignment, margins, text colour, logo types, display for mobile devices, and more
-
Make Mobile View Adjustments - Adjust the style of messaging for mobile devices
-
Add a Footer Payment Icon - Add a payment icon to the bottom of the page
This information is for Shopify 2.0 Themes
The instructions below apply to Shopify 2.0 Themes only.
Install the Clearpay On-site Messaging App
Do the following:
- Click the link to download and install the Clearpay On-Site Messaging app from the Shopify App Store.
Add the Messaging to the Product Pages
-
Once installed, you need to open the Clearpay On-Site Messaging app. To do this, go to Shopify Admin. Then go to Apps and select Clearpay On-Site Messaging.
-
From the app's Add Messaging section, click Open Theme Editor
-
From the Theme editor, click the dropdown at the top of the editor, then click Products.
-
Select the Default product template, or the Product template that needs messaging.
How Messaging Works
Messaging works on Product Page templates. So if you have a single Product Page template, you add messaging to that template. If you have several different Product Page templates, then you'll need to add messaging to each one separately.
- Move your mouse over the Product price, a + symbol appears.

- Move your mouse over the + symbol until the Add Block button appears.

- Click Add block and then select Payments Messaging - Clearpay On-Site Messaging.

The Product page should now look like this:

- Click Save in the top right corner.

Add the Messaging to the Cart Page
You are now ready to add some messaging to the Cart page. Do the following:
- For an accurate Cart page preview, click Add to cart

- Next, to open the Cart page, click the dropdown at the top of the editor and click Cart.

- Move the mouse over the Subtotal above the Checkout button. A + symbol appears.

- Move the mouse over the + symbol, an Add block button appears.

- Click Add Block and select Payments Messaging Clearpay On-Site Messaging

- If the text alignment is wrong, adjust the text alignment. To do this, click the Text Alignment dropdown and select a new alignment option.

Mobile view
You can set a separate alignment for display on mobile devices.
Do the following:
- To check the appearance on a mobile device, click the monitor icon and then click Mobile at the top right of the editor.

-
Scroll down to Mobile View settings, make any changes you need.
-
Click Save in the top right corner.
-
Verify your messaging and alignment on your live store.
You can adjust various aspects of the page for mobile devices. See the Mobile View Adjustments section below for more details.
Adjust the Style of Messaging
You can adjust many aspects of the styling. To do this:
- Select the Payments Messaging - Clearpay On-Site Messaging block on the Product page.

Alternatively you can select Payments Messaging - Clearpay On-Site Messaging from the side bar under Product information. See picture below:

Text Alignment
To adjust the text alignment:
- Click the Text Alignment dropdown and select a new alignment option.

Margins
To adjust the margins above and below the messaging:
-
Enter a new value into the Margin Top field.
-
Enter a new value into the Margin Bottom field.
Negative values are allowed..

Text Colour
To adjust the text colour:
- Click the Text Colour colour-picker and select the new text colour.

Text Size
- Click the Text Size dropdown and select a new text size option, extra small, small, medium and large.

Intro Text
To adjust the intro text:
- Click the Intro Text dropdown and select a new intro text option. The options are, In, in, Or, or, Pay, pay, and Pay In, pay in.

For example, in the picture below the intro text is Pay.

Show/hide "interest-free"
To show or hide the interest-free phrase:
- Enable or disable the Show "interest-free" checkbox. In the intro text example above, the interest free phrase is enabled.

The default value is enabled - so the phrase interest-free appears to your customers. In the picture above, the checkbox is blank, so no interest-free message appears to your customers.
Bold Payment Amount
To show or hide the payment amount in bold:
- Enable or disable the Bold Payment Amount checkbox.
The default value is enabled - the payment amount is in bold. In the interest-free picture above, the checkbox is enabled, so the payment amount appears in bold to your customers.
Show/hide "with"
The word with appears between the price and the Clearpay logo or badge. See the Logo Type below. To show or hide the word with:
- Enable or disable the Show "with" checkbox. In the picture below, the word with is enabled and appears before the Clearpay logo. This is the default setting.

Logo Type
To set the logo type:
- Click the Logo Theme dropdown and select a new logo type.
![]()
Logo Theme
To set the theme of the logo:
- Click the Logo Theme dropdown and select the new logo theme you want.
![]()
Modal Link Style
When a customer clicks on the modal link, a pop-up window appears with more information about Clearpay. The default symbol for the modal link is a circled info icon ⓘ.
To change or hide the modal link:
- Click the Modal Link Style dropdown and select the new modal link option.

The modal link choices are:

Modal Theme
The modal theme is the information the customer sees when they click the modal link. There are two options, a design in mint and and a design in white. To adjust the modal theme:
- Click the Modal Theme dropdown and select a new modal theme option. The example below shows the white option.

Outside Order Limits Messaging
The outside order limits messaging is a message displayed when the product price is outside the limits for Clearpay.
Currently the default for these limits are £1.00 - £1,500.00 for the UK.
To adjust the outside order limits messaging:
-
Disable the Show Lower Limit checkbox to hide the lower limit.
-
Enter a new amount in Minimum Order Limit to show the outside order limits messaging for products under this limit.
Note
The Minimum Order Limit should match your Clearpay account. Remember this setting only affects the messaging and not whether customers can buy products at the checkout.
-
Disable the Show Upper Limit checkbox to hide the upper limit.
-
Enter a new amount in the Maximum Order Limit to show the upper limit for products over this limit.
Note
The Maximum Order Limit should match your Clearpay account. Remember this setting only affects the messaging and not whether customers can buy products at the checkout.
Disable Show If Outside Limits to hide the outside order limits messaging completely.

Mobile view adjustments
You can set the styling separately for customers on mobile devices. To set the styling for mobile devices, do the following:
-
Click the monitor icon near the Save button.
-
Click the Mobile button that appears.

Breakpoint
To adjust the screen width that defines the mobile view:
- In the Breakpoint field, enter a new number in pixels.

Text Alignment
To adjust the text alignment for a mobile view:
- Click the Text Alignment dropdown and select a new alignment option.

Margins
To adjust the margins above and below the messaging on a mobile view:
- Enter a new number, this can be a negative number, into the Margin Top or Margin Bottom fields.

Footer Payment Icon
To place a payment icon on the footer (bottom) of the payment page, do the following:
-
From your Shopify admin, go to Online Store and select Themes.
-
Select the theme you want to edit, click the ... button to open the Actions menu, and then click Edit code.
-
Open the Sections folder and click footer.liquid.

If your theme doesn't include this file, click theme.liquid in the Layout folder.
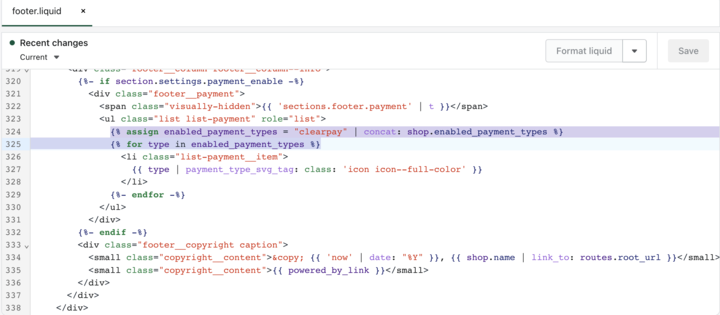
- Find the following code in the file:

- Replace the highlighted line in the example with the following two lines of code:
{% assign enabled_payment_types = clearpay | concat: shop.enabled_payment_types %}
{% for type in enabled_payment_types %}
Once you have made your replacement, the code should look like this:
-
Click Save.
-
Verify on your live store.
Code language
The code examples above are in Liquid, which is Shopify's own code language.
Updated 6 months ago